Welcome Everyone!

Remember to "click" on all pictures if you'd like to see them a little closer.
Showing posts with label cardmaking. Show all posts

Wednesday, November 4, 2020

Wild Whisper Triple Pop Up Cube Card - Play in the Dirt


Hi everyone! Welcome back!

Today, I'm sharing an A2 Triple Pop Up Cube card that I created using the new Wild Whisper collection "Play in the Dirt".


I've seen a lot of different varieties of the Triple Pop Up Cube Cards, but I liked this version where the two smaller boxes are different heights and widths, so I went with it. This video is the one that inspired me to make this card: https://www.youtube.com/watch?v=U3qlnPXN09A&app=desktop 

These cards look complicated, but they are based on the simple principle of gluing 3 different boxes together. I used Bazill's heavyweight 100lb cardstock for the card bases. It is very sturdy and stands up to all the bending and folding without sagging.


I started with the tallest box first. Measurements for cutting were:

Card base - 5-1/8" x 8-1/4" - cut one. Score it at 2", 4", 6", and 8". The remaining 1/4" will be the tab that you will glue the box together with. Mitre each of the glue tab corners.

Outer patterned paper pieces - 5-1/16" x 15/16" of an inch - Cut 4

Inner patterned paper pieces - 3" x 15/16" of an inche - Cut 4.

Glue box together with glue tab on the inside of the box. Cover your box with the patterned paper inside and out. 

 *I made a mistake when making mine. You shouldn't be able to see the glue tab as you can in the upper corner above. Be sure and place your patterned paper on this side AFTER you have glued the box together and it will cover up that tab. I corrected this flub by fitting another piece of patterned paper over top of the glue tab but it still bugs me! :)


This photo gives you a clear view of the different sizes of boxes, all glued together.

Measurements to cut the box on the left are:

Card base - 2" x 61/2" Score it at 2", 3", 5", and 6". The remaining 1/4" will be the tab that you will glue the box together with. Mitre each of the glue tab corners.

Dark coloured patterned paper pieces: 1-15/16" x 1-15/16" - Cut 2. 
Dark coloured patterned paper pieces: 1-15/16" x 15/16" - Cut 4. 
Light coloured patterned paperpieces: 1-15/16" x 1-15/16" - Cut 1.

Measurements to cut the box on the right are:

Card base - 2" x 61/2" Score it at 1-1/5", 3", 4-12", and 6". The remaining 1/4" will be the tab that you will glue the box together with. Mitre each of the glue tab corners.

Dark coloured patterned paper pieces: 1-15/16" x 1-15/16" - Cut 6. 
Light coloured patterned paper pieces: 1-15/16" x 1-15/16" - Cut 1.
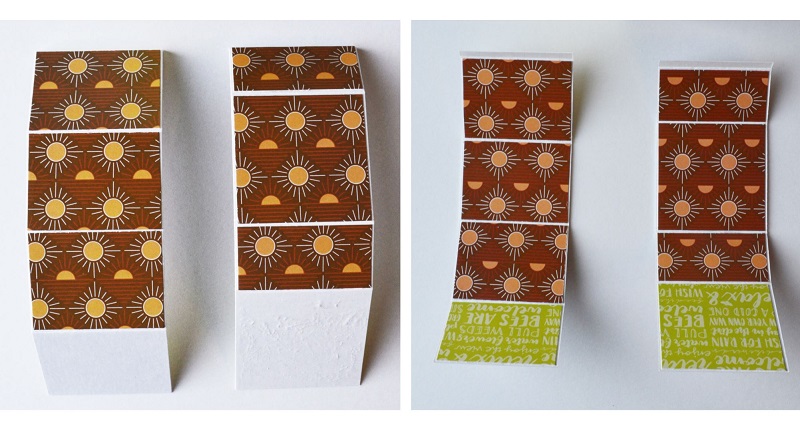
I found it easier to glue on all the patterned paper pieces, before I glued the smaller boxes together. This time the glue tabs can be glued on the outside, as that side will be the side that gets glued to the tallest box. (That's why there is no patterned paper on one side of the box - that's the side that glues to the tall box.) The left photo above, is the outside of the boxes. The right one is the inside of the boxes.


Glue your boxes together and glue them to the taller box as shown above.

Now the fun starts, as you begin to decorate your card. I found it was just like arranging furniture in a doll house! :)


I started by placing all the background images, using pieces from the "Play in the Dirt" ephemera pack. Then I added the mechanisms on the corners of the tall box, that will hold the ephemera sentiments.


You can see a closer look at the mechanisms above. They are super simple to create. Mine are 1/4" x 1". Cut two, fold them each in half, and glue one on each side of the corner as in the photo. This leaves you with a flat surface to glue the 'Urban Jungle" and "Home is Where the Plants Are" ephemera to.

You could stop here and you would have a great card, but to make it even greater and add extra dimension, create some pop up features that sit on the ledges of the small boxes as seen below.


The mechanisms that you need to do this, are very simple to make. 


I started by cutting 1/4" strips of paper. Score at 1/2" to create the tab that you will glue to the ledge. Then figure out how tall you want the portion that will glue to the piece of ephemera, score it at that point. Score it 1/2' from there, and score it again for a quarter inch glue tab that will attach to the tall box. 


It's quick and easy to do, and gives your card a very dimensional look.


When you're gluing on your ephemera, don't forget the bottom of the boxes!


This is why.... the bottom folds up to flatten the card, and you still have a pretty card in the flattened stage! The size at this point is 4.25" wide and 5.5" tall.


I added one of the border strips to the top of the box to give it a more finished look. 


Last but not least, the above photo shows the back of the card. The left side is where you could add a piece of cardstock to write your greetings on.


Whew! You've done really well if you've made it to the bottom of this tutorial!! I hope you give this type of card a try. They are a lot of fun to do!

If I've put you in the mood for shopping on the Wild Whisper site, enter my design team code (DTLINDA) in the coupon box for an extra 10% off your purchase!

Happy creating!

Linda


Thursday, September 24, 2020

Wild Whisper - Fall Sunflowers

 Hi everyone!  I was playing with the Strength of the Season stamp set again this week, and ended up creating a card that is a personal favorite of mine. 


I have to admit though, it seemed to take me longer to photograph it than it did to create it!  For some reason it was hard to capture the true colours of the card and the glitter on the sunflowers and pine cones that is so pretty in real life!  You can see a bit of it in this side-shot below.


I zoomed in on the sunflowers to share a close-up of how I coloured them.  Using golds and yellows just seems so right at this time of year when all the trees are turning colour.

To colour the petals I used the following copic colours in this order: Y11, Y19, YR24, E17,  & Y17.  I painstakingly coloured the centers with:  YG00, YG13, E47, E37, E34, E49, & E34... then I covered them all up with Nuvo "Fresh Snowfall" Glitter Accents!  It might seem like a waste of all that colouring, but the coloured centers still show through... the glitter just gives them some dimension and sparkle!

For the leaves I used: G28, G21, and G20.  The acorns were: E17, E37, & E47.


I used these flowers in this blog post... and you can see I coloured them quite differently!  That's the fun of stamping!

The burlap paper came from a past collection called "Forever and Always".  I made the rust coloured mat by colouring the border of a piece of X-press It paper with E37, and I inked the burlap with "Gathered Twigs" Distress Oxide ink.


Here's a look at how I finished the inside.


Happy Fall everyone!  We're being blessed in Alberta with warm temperatures and an extended flowering season so life is good!

Don't forget, Wild Whisper has just filled the store with new releases!  Go here for some shopping therapy and enter my code:  DTLINDA in the coupon box to get a 10% discount!!

Happy creating,

Wednesday, September 9, 2020

Wild Whisper - Magical Moment

Hi everyone!  

I have a different style of card to share with you today.  It has been inked up with lots of Distress Oxides and I used several different Wild Whisper stamps to create the scene.  Stamp sets used are:  Adventure, Home for the Holidays, Christmas Comfort, and World's Best.


I started out with a piece of cardstock 2-3/4" x 7-3/4" and did the technique I'm sure most are familiar with, squishing Distress Oxide ink pads onto my mat, spraying the ink with water and blotting and drying the cardstock over and over until I was happy with how it looked.  The colours I used were Stormy Sky, Faded Jeans, and Blueprint Sketch.  


I used SazOn Pigment Ink to stamp the bear, mountains, and antlers, and this was a mistake. This ink isn't designed for paper (as I found out afterwards) and you can see it didn't do a good job of stamping.

For this type of card you want a deep black image, so in future I would use an ink like Black VersaFine.  I didn't want to throw my card away though, so in the end I coloured over the images with a sharpie marker, and that saved the day!

To stamp the various branches and snowflakes around the edge of the card, I used Dusty Concord Distress Archival Ink.

To give a little shadow at the base of the mountain, I used Iced Spruce.


To highlight the bear, I created a mask using my roll of tape that was handy on my desk.


Holding the mask over the bear, I sponged Blueprint Sketch Distress Oxide, sweeping it from the mask outwards.


After masking, there is a lovely glow around the bear.


The card was matted with silver glitter paper and mirror card by Crafter's Companion - Morning Mist Pack.


Finishing touches were to add snowflakes cut from the same glitter paper, and a little bit of sparkle here and there with Fresh Snowfall Nuvo Glitter Accents.  I also stamped and heat embossed the title "Magical Moment".


I find slimline cards are fun to create scenes with.  Pull out your stamps and give it a try!


Wednesday, June 24, 2020

Wild Whisper Masculine Cards

Hi everyone,

I'm up on Wild Whisper's blog today, and I'm hoping to help you out with one of the biggest stumbling blocks for card makers... masculine cards!  Am I right???

Wild Whisper's Adventure collection makes it easy for you! 

To make this set of four cards, I used the card pack, the ephemera pack, sequins and a few flair buttons.  I always use 110# cardstock for the card base, and I popped up the focal images on each card.

This first card is my favorite of the four, because I just love this bear.


Card number 2 is one that I thought would make a great anniversary card for that adventurous couple that is always off hiking.


Card 3 is just plain fun with its collage of sayings and images! (All done for you on one collection card I might add. Easy peasy!!)


Card 4 would make a nice "Thinking of You" card.


There you have it!  In the time it took you to read this post, I finished up 4 cards!  Well.... maybe it took a wee bit longer, but not much!  

Happy Creating friends!

Linda


Thursday, April 16, 2020

MTW Mini Challenge - Do All Things With Love

It's time for a new challenge at More Than Words!  

Our April Mini Challenge has now been posted and as usual there 
are some awesome prizes up for grabs from 

This month we are asking you to use the word ALL somewhere on your project.


The Mini Challenge runs on the last two weeks of each month and is for:
 cards, tags, ATCs and postcards only.  

This challenge requires you to use a specific word on your project. 
We must see the actual word

*ATCs. or Artist Trading Cards, are small works of art,
about 2.5 by 3.5 inches or 64 x 89 mm.

This month we are asking you to use the word ALL somewhere on your project.


You have two weeks - until the last day of the month - to enter, so be quick!

Post your entries on our Facebook page here.


My favorite things to tend in my home are my houseplants!  For this card, I used Kaisercraft's beautiful Greenhouse 6"x6" paper as a base and to cut my die cuts from.  The green lacey flowers were cut using Tim Holtz's Bouquet die below.


I just snipped a couple of flowers out of the die cut and tucked them under the doily at the top and the bottom.
The doily die is a favorite of mine from Close to my Heart.

I cut the beautiful succulent flowers from one of the floral papers in the pack and stacked them with foam pop ups between each layer.


The quirky little bunny is from Tim Holtz of course!  The die set is called Bunny Hop.  I gave him some sparkly eyes with tiny little embellishments from Close to my Heart called Bitty Sparkles.


I put the bunny's two little dancing partners on the inside!  

I hope I've inspired you to give the challenge a go this month.  To see lots of inspiration projects from the rest of the design team, go here.

Happy Creating!

Linda


Wednesday, February 5, 2020

Faux Mixed Media cards... You'll Love How Easy They Are!

Hi everyone,
These cards might look like I spent all day painting and working with alcohol inks... but thanks to Nicole Wright... I didn't!
                                                                                                                                                            I used the following sheet of paper from Nicole's Mixed Media Assemblage paper collection, to create focal points for all four of my cards.
                                                                                                                                                    Nicole describes this paper as being made for layering extra paint and mixed media elements on top, so I started by splashing my card pieces with a little bit of gesso.  *hint... the packing box that Wild Whisper's paper comes in is perfect for small jobs like this!

This first card I created by heat embossing Nicole's beautiful Botanic stamp set with clear embossing powder.  (I meant to use white!)  Once I realized I had used clear, I needed to think of a way to bring out the flowers on the stamp.  I took a white chalk marker I had on hand and coloured the parts of the flower, and then I went over it again with the same marker, using a dabbing motion to get the "dotted look".  It turned out to be one of those "happy accidents" because I really liked the effect when it was done!  The front panel is popped up to give it some depth.


This second card is clean and simple.  I accented it with Strength of the Season sequins and some pretty purple foil mirror card that I had on hand.

                                                                                                                                                            Isn't this paper pretty!  It stands on its own with barely any embellishing.  (Of course more sequins from Strenth of the Season did add some sparkle!)
                                                                                                                                                      This following card, made use of some flower bits I had left over from this project.

                                                                                                                                                    These cards are all 4.25"x5.5", so they didn't use up much of the patterned paper.  I still have lots left to make more cards... maybe you'll see that white embossed one yet!  ;)
Thanks for stopping by today.  If you've caught my enthusiasm, and NEED this paper collection, don't forget to use my code: DTLINDA in the coupon box for a 10% discount .  Shop here.
Happy creating!