Welcome Everyone!

Remember to "click" on all pictures if you'd like to see them a little closer.

Monday, December 23, 2013

Silver and Gold Christmas bag

Hi!  I'm back again!  (So much for not posting until after Christmas!)  I'm on a roll today! There's nothing like the 24th drawing near to kick me into high gear!!   LOL

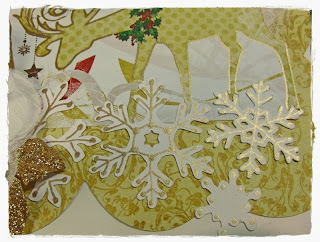
I made a "Silver and Gold" bag to coordinate with an ornament I made a while back.  (You can see it here.)  I used left-over scraps of the Bo Bunny "Silver and Gold" collection.


I cut the deer out of one of the papers and then in order to get them to stand out against the gold background, I took a gold Sakura Gelly Roll pen and traced their outlines.  I also used this pen to doodle on the snowflakes.


Then I cut the title with my Cricut and coloured it with a Gold Leaf Krylon pen.


The Flying Unicorn has a challenge here where you can share your Gift Bags with everyone.  There are some beauties that have already been entered.

Happy wrapping!
Linda


Christmas Stocking Box

Hi everyone!

I just had to share this cute little Stocking box that I made this weekend.  Tammy at the Flying Unicorn created this sweet little pattern and is sharing it here.  


Tammy is hosting a challenge until Jan 14th.  All you have to do is make one of these boxes and share it on the Flying Unicorn forum here.  There's a wonderful prize to be won as well!  Do check it out!!

This will probably be my last blog post until after Christmas, so I would like to take the opportunity to wish you all a very blessed and happy holiday with your families.

Merry Christmas!

Linda


Friday, December 13, 2013

Festive Friday Blog Hop!

If you have arrived looking for the Sketch Challenge at Scrapbooker's Paradise, please go here.

Hi everyone!

Welcome back to another Festive Friday Blog Hop with your friendly CTMH consultants!

Our path is circular, so just follow the links.  If you should get lost, see the master list below.  You should have arrived here from Carol Loftus.


I thought I would show you the variation I did with the Advent Calendar that you can see in the Holiday Gift Guide on page 3.


I wanted to give the calendar a little more of an elegant feel, so I tied a bow with our Dark Chocolate Striped Grosgrain Ribbon, tucked in some silk holly leaves, and draped our beautiful Sparkles Flourishes here and there for a Wow! effect.

Quick, easy, and beautiful too!  

Supplies used to make the Advent Calendar:


Thanks for stopping in to see what I've been up to!  Now it's time to go see the lovely creation Jamie Barney has to show you!  Enjoy the rest of your "Hop"!

Linda


Thursday, December 12, 2013

Scrapbooker's Paradise has a new Sketch Challenge up!

Hi everyone,

Welcome back!  

Dawn is hosting the Sketch Challenge this week at Scrapbooker's Paradise!  Come join in and show us your creations.  You not only have the chance of winning an awesome prize package but you will also get the chance to Guest Design with us next month!  Fun!  Fun!  Fun!

While you're over on the Scrapbooker's blog, say hello to our new design team member Lee-Anne Thornton!  We're very happy to have her join us and know you can look forward to lots of inspiration from her.  Check out her website here.

My layout that I did with this sketch, was inspired by Jennifer Snyder.  She created SUCH a beautiful winter layout using Kaisercraft's Enchanted Garden, that I just HAD to give it a try myself!  This photo of my daughter-in-law and grand-daughter just begged to be used with this paper line.  Don't you agree??  :)


Who would have thought that you could use this paper line for a Christmas layout!!  Thank you so much Jennifer, for your inspiration.


Stickles, and glitter, and spray .... oh my!!  :)


Lots of bling and depth, and shabby goodness.


You have three weeks to link up your entries, I sure hope you'll give the challenge a try.  I look forward to visiting your blogs!


I would like to mention that the photo for this layout was taken by a wonderful photographer here in Strathmore, Deidre Cameron.  She has taken some wonderful photos of my family over the last couple years.  I did a layout here and here with past photos.  To see more of her fabulous work, check out her Facebook page here.

Take care,
Linda

Supplies used:

Viva Pearl Modeling Cream - used to stencil circles on background
Circle stencil
Vintage Photo distress ink - inked holly leaves on background
Holly leaf stencil
Kaisercraft Enchanted Garden paper collection for background, pointsettias, holly leaves and paper lace strips under photo.  (It's on SALE right now!!)
Kaisercraft Wooden Holly flourishes embellished with Stampendous Shabby Pink embossing enamel.
Pointsettias created with Tim Holtz Tattered Pointsettia die, painted with Picket Fence Distress Stain and Gesso, finished with a little Diamond Stickles.
Holly leaves cut with Cricut, rubbed with Vintage Photo Distress Ink and Gold Inka Gold.
Other flowers:  Prima Queen Mary Vintage, Prima Perla, misc from my stash.
Melissa Frances Angel resin piece
Martha Stewart punch for the paper lace pieces.


Wednesday, December 11, 2013

It's a Wild Wednesday at Scrapbooker's Paradise

Hi Everyone,

I'm hosting Wild Wednesday over at Scrapbooker's Paradise and would like to invite you over to take a peek at how I made this little mini album from G45's Typography collection.


I owe the inspiration for this album to Sherry Mendoza.  Check out her version here.

These little albums will make great Christmas gifts.  I hope you give one a try!

Thanks for stopping by!

Linda

Tuesday, December 3, 2013

Technique Tuesday at Scrapbooker's Paradise

Hi everyone!

It's my turn to host Technique Tuesday at Scrapbooker's Paradise, and I created a Christmas ornament with a piece of the chipboard from Bo Bunny's Silver and Gold collection that I have loved from the moment I saw it!

 
I explain all about how I made it on the SP blog, so do check it out - I think you will be a little surprised to find out what the base is made from!
 
This ornament is going to be a Christmas gift, and after it was finished I started thinking about how I would wrap it.  Alda at the Flying Unicorn, always says presentation is everything, so I wanted to make something special to present it in.  After sorting through my stash of goodies in the basement, I discovered the ornament fits very neatly in the back of a 5x7 inch canvas frame!  So I set about decorating the frame to match my ornament. 
Let me tell you, Scor-tape was my best friend during this process!
 

After covering the back with Scor-tape, I painted the wood on the inside with Inka Gold "Old Silver".  (Just spritz some water in the jar and dab your paint brush in - it's not just for rubbing on!)  Then I covered the back with some plain white ribbon from the dollar store.


Next I added an open weave ribbon over top, some white and silver ribbon, and some flowers and pale gold bling.  The darling reindeer from the Silver and Gold collection was cut out and score-taped onto the inside.

 
I tucked my ornament in, and now it's ready to be wrapped and put under the tree!
 
 
Thanks for stopping by today.  Alberta has been hit by a huge blizzard.  Roads are closed as travel is very dangerous and there's a 4 foot snow drift in front of our front door that makes getting in and out very difficult.  We keep shovelling and the raging winds keep filling it back in.  It was a very good day to stay inside and create a Christmas gift!  I hope you enjoyed viewing it and got some inspiration to create one of your own.
 
Stay warm everyone!
Linda 


Sunday, December 1, 2013

Welcome Christmas into your Heart!

Hi everyone! 

The first day of December!  Imagine that!  I spent it having fun in my craft room.  I wanted to enter a contest at Swirlydoos, so I decided to use the techniques from Sandy's 2nd tag at Scrapbooker's Paradise to create my entry.

Pictures just don't do these tags justice.  The sparkle and shimmer from the glitter and Inka Gold is just beautiful.  As the contest required a Santa on the tag, I made my pointsettia smaller and used a fussy cut image from Kaisercraft's St. Nicholas Collection.  Metal was also required, thus the metal corners!
 
For the next twelve days, Swirlydoos' designers are going to be handing out assignments to be completed.  These assignments must be posted to Swirlydoos' gallery by midnight EST on the day they are assigned.  The contest is open to anyone, using any supplies.  See more information here
Chat with the other contestants here.

Now I'm patiently waiting for a No More Shims Embossing Mat to arrive and then I'm going to tackle Sandy's 3rd tag!  It is cute, cute, cute!!

Have fun creating during this wonderful month full of glitter and sparkle!
Linda
 

Supplies used:

Tim Holtz tag
Distress Inks:  Barn Door, Festive Berries, Spiced Marmalade
Kaisercraft "St Nicholas Collection" - Santa image
Tim Holtz "Tattered Flower Garland" die - pointsettia
Tim Holtz "Holiday Joy" set - image of deer
Martha Stewart Pine Branch border die
Sentiment from Flourish's "Home for the Holidays" stamp set