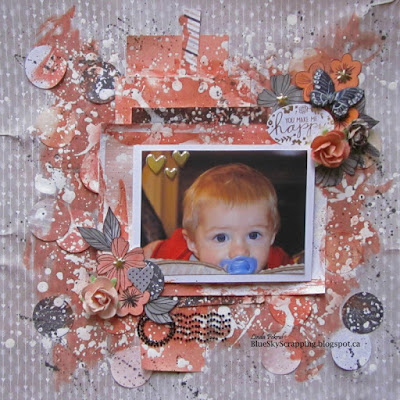
The challenge that I did today, was fun….TOTALLY fun….even though I had to prepare for it like I was going to attempt to climb Mount
Everest!
Sherri, our SGC host at Swirlydoos this month, felt we too
often use the excuse of “no time” to not do any creating, and she wanted to
show us that we CAN create something in only 30 minutes. Yes… you heard correctly… we had 30 minutes
to create a layout! Now if you know me,
this was a HUGE challenge! I’ve been
known to dither over flower arrangements for over an hour… let alone all the
other elements of a layout.
Disclaimer: After each layer of gesso and painting, I DID stop the clock while I threw the layout in the oven at 200 degrees to dry. Once it was dry…the clock was re-started.
I mulled this challenge over for a long time before attempting
it. LOL.
My first step was to study a video
done by one of the designers at Swirlydoos,
Cindy Brown, who claimed to love doing layouts in 30 minutes. If you’ve seen Cindy’s work, it’s awesome… so
that’s where I headed first, to see how she creates her magic… and yes… I might have watched her video 4 or 5
times before I felt confident enough to begin!
My second step, was to use all the leftovers from the layout
I made a couple of days ago. You can go here to see it. I figured I was being pretty clever with this
idea… because I already had practiced putting the flowers together in clusters
on the other layout. Oh yes… I’m a
sneaky one!
So I gathered all my supplies close to my craft mat, set the
timer on my phone, and began. Cindy has
a very cool technique in the video for creating a layered mat under your photo and I began
with that. In her video she also uses some
circle stickers on the background, so I used a punch to cut out circles from my
scraps… oh such a time consumer that was!
I kept glancing at the timer, watching the seconds steadily ticking
by. Be still my pounding heart!
When circles and mats were glued down, the fun began. Cindy creates an awesome effect with watered
down gesso (which I had already prepared) and I couldn’t wait to try it. I grabbed my brush and flicked and waved it
with gay abandon… I loved watching the big white splotches explode
everywhere! To my woe though, I
discovered when I was done, that my craft mat wasn’t big enough to contain ALL that gay abandon, and watered down gesso really FLIES through the air AND I
hadn’t covered my wooden dining table.
More precious seconds ticked by as I grabbed baby wipes and frantically
scrubbed down splatters of gesso that were everywhere!
To get the soft peach look on my layout, I used my CTMH
watercolor paints. I find that #10 from
the top is the perfect shade for the Charlotte paper pack.
Time was now running out on me, so when I got to the
flowers, I threw the glue on them and smacked them down anywhere… it didn’t
matter if two orange colored ones were side by side, it didn’t matter that I
got a little extra glue on the journalling chippy and it looked sloppy, it didn’t
matter if they didn’t look totally “balanced”… I just needed to get those
suckers down there before that clock stopped ticking!
And you know what????
I did it! I did it and I had
great fun doing it. (I mean who doesn’t
love a little adrenalin rush???) Not
only that… I LOVE this piece…. And I feel like an artist!
This is why I love scrapping challenges… they take you
outside your comfort zone …. And they teach you something new!
If you would like to see how some of the other girls handled this challenge, go here.
Much thanks to Cindy for the time she takes to put tutorials
together, and the inspiration that she shares so readily! You can see all of her videos here.
Thanks for coming on this adventure with me…. I hope I have
encouraged
you to try one of your own!
Linda
