Today, we are releasing our June Main Challenge over on the More Than Words challenge blog: HELLO and WINDOWS & DOORS.
For this layout, I finally gathered up my courage and cut into the Mintay Papers'
"Beauty in Bloom" paper collection that I've been hoarding. Spring is my favorite time of year and the paper had all the elements required for the challenge.
Our Main Challenge at More Than Words is always based upon a word inspiration and a creative challenge. For June the word is HELLO, and the creative challenge is to use either a window and/or a door on your project. You can see the rules of the challenge
here.
To create this layout, I started out with this page for the base:
I changed it by adding the banner pieces from the coordinating cardboard stickers, and a lot of fussy cut embellishments from the image sheet in the collection. Here's a close-up of the banner.
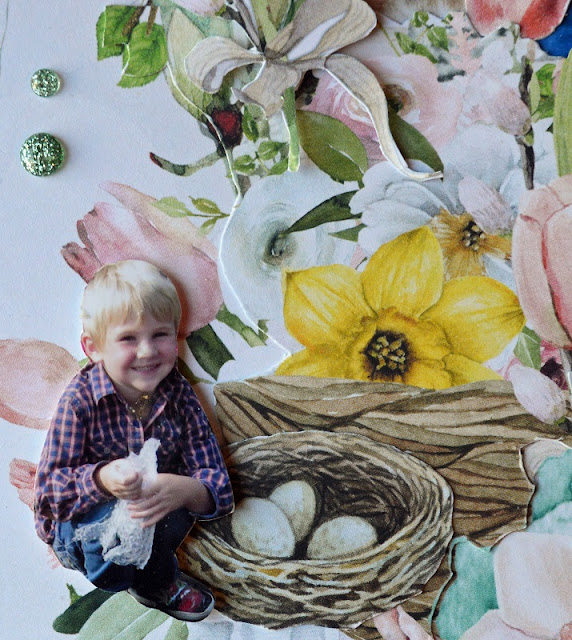
For the focal part of the layout, I situated my grandchildren on the window ledge, and then built up the left side of the page with bits and pieces of flowers, plus that cute bunny. A few of the elements I popped up with foam. (I will always giggle at this photo of Austin... the little munchkin had dressed himself that day and put his jeans on backwards. There was no way he wanted to change them around either!!)
Beside "big" Emily, I added a bird for "little" Emily to hold out her hand to. She loves birds... especially when they jump onto her hand!
Creating these little scenes on the layout was the fun part for me. I could imagine how happy and excited the kids would be if they could play with bunnies and birds. That piece of plastic that 4 year old Austin is holding is bubble wrap. My grandkids are crazy for that stuff. It's the best toy ever! They love popping it!
I filled up the bottom right corner with this little scene.
So how did I figure out the sizing for the kids photos? I started out with the photo below. (We were having a fun photo shoot in my front garden that day.) I liked the fact that the kids were sitting in this photo, because I knew I would be able to sit them on the window ledge once I fussy cut them out. Their images in this photo were too small though... I knew I wanted them to be about 5" tall.
So I cropped the photo and sized it to be about 5-1/2" tall and 6" wide. I also cropped out Emily's dolly bag that was sitting at her feet. (She was taking very good care of her dolly that day!)
For the other 3 scenes I used these photos, cropped them as I did above, but this time I re-sized them so the kids were only 2" tall. (I had just finished planting my yard - we removed all the grass and put shrubs and perennials in - and the kids were sharing their favorite parts of it with me.)
So this is what the sheet that I printed looked like, once I had everything all cropped and sized to how I wanted it. Then I just fussy cut the kids out of the photos.
I hope this has helped you, if you should ever want to try creating your own fussy cut scenes!
Please be sure and go to the More Than Words blog
here, and check out all the fabulous projects the design team has done to inspire you.! Then maybe give the challenge a try yourself.
We have some fabulous prizes up for grabs!
Happy Creating!
Linda
PS If you're interested in seeing "Then and Now" photos of my yard project, I've shared them below.
This first one is what the front yard looked like when we purchased the house. The grass was always scruffy... we just couldn't get it to grow. I was also looking for some extra gardening space because our dogs have the run of the backyard, and you know what dogs are like... they chew plants and dig holes. So out went the grass... we brought in some loads of topsoil, and got busy planting.
The plants all looked so tiny, but I loved it much better than the grass.
This is it about 4 years later. It was well worth all the hard work!
(I don't miss mowing the lawn one bit!)