Welcome Everyone!

Remember to "click" on all pictures if you'd like to see them a little closer.

Monday, February 20, 2017

Two People, One Love

Hi everyone,

I'm back today with another project that I have done for Wild Whisper Designs.


I decided to use the Rooted Love paper to create a wedding layout.

I started with the February sketch at Creative Scrapbooker Magazine.

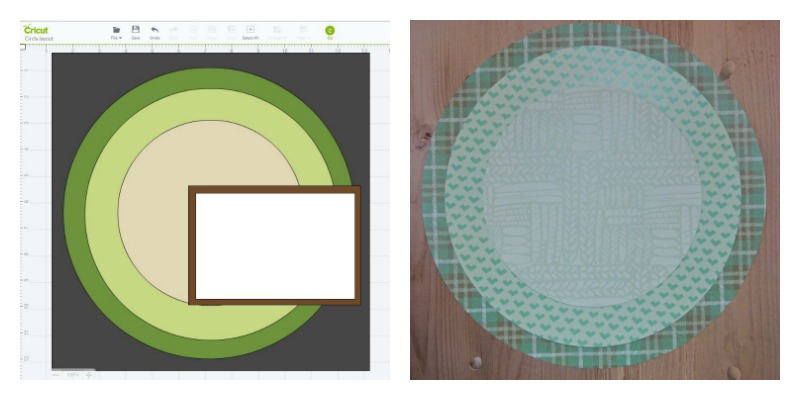
When I'm using a sketch, I always go to Cricut's Design Space to work out the proportions of my paper and then to cut the pieces.  Below, I'm showing you the Cricut design, and the base of my layout after it's been cut on the cricut.


To embellish the layout I used my set of Heartfelt Creations Blushing Rose stamps and dies.


I only needed 3 ink pads and a waterbrush to watercolour everything.  If you haven't tried it, it is a lot of fun.  I take the ink pad and swipe it on my silicone mat and use it as a paint palette.  Because I wanted the leaves to blend in with the beautiful aqua colours of the paper, I chose a Lagoon colour to paint them, instead of a traditional green.


On the picture above, you can see where I painted double layers of the bigger flowers and glued them on top of each other to give the layout dimension.  That fabulous wooden "love" and the hearts are Wild Whisper products.


I used a pretty package of  Wild Whisper sequins in the centers of the flowers and scattered around the page.  They really add a pretty sparkle.


I cut the bird from one of the papers.


Another close up of the flowers with their sequin centers.


A tip when you're using a stamp set to embellish.... stamp LOTS of images so that you have plenty of leaves and flowers to work with.  To make the flower frame above, I not only used full stamps, but I stamped extra pieces and snipped off extra leaves and bloom to fill in here and there where I felt the layout was a little sparse.  That way you get a lush, fuller flower wreath.

I hope I have given you some ideas on how to use the Rooted Love papers during my guest month as a designer with Wild Whisper, and shown you how versatile they are.

I have truly enjoyed working with these papers, and a big thank you to Suzy and Heather for the opportunity!

Watch for their next paper collection in March!

Thank you so much for stopping by!

Linda


Monday, February 6, 2017

"Something I Love" challenge

Hi everyone!

Over at the Swirlydoos monthly round robin challenge, the theme is "Something I love".  This beautiful photo of my daughter was perfect for it.  I was able to surround it with all sorts of pretty pinks, which was one of the challenges given to us.


My daughter has been a blessing to me and I wish her all the joy in the world!


Kim wanted us to use techniques we love.... so I incorporated watercolouring (which I'm just learning to do), stamping and making flowers.


This beautiful rose is from a CTMH stamp set called "Hello Lovely" that I am absolutely smitten with.  I think it is SO pretty.  I used watercolours to paint it.


Above, I took the darker shades of watercolours from my rose, and added touches here & there to the flower border to tie it visually to my rose.


This cluster above, was created by first stenciling a flower pattern in white crackle texture paste, letting it dry and shading it with plum Archival Ink.  Over top of that I add a coating of Frosted Lace stickles.

The flowers were made with various Spellbinders dies and each was also coated with Frosted Lace stickles.  The hearts are a set of dies from CTMH called Thin Cuts - Hearts.

Off to the side, I stamped a border with plum Archival Ink.


One of the fun elements of the challenge is to dig into your old stuff that you've been hoarding... and use it!  So I pulled out the die frame "Lovin' Diamonds" from Spellbinders that I've had forever, and some of my treasured crystal flourishes which nobody seems to use anymore.  I love them!  The die cut "smile" is also from an old pack of embellishments that came from CTMH.

Thanks again for stopping by.  Everyone always leaves such nice comments and I truly appreciate them!  

Hope your day is happy and filled with love!

Linda


Rooted Love!

Hi everyone!

I'm really excited today to share with you, a layout, that I have done as a Guest Designer for Wild Whisper Designs.

Wild Whisper is a new Canadian company in the scrapbooking and papercrafting industry that just launched last November, 2016.  Heather and Suzy design their products and have them manufactured in Calgary, AB.  I fell in love with the rustic, unique flavor of their papers instantly... pure Canadiana at its best!

A new collection comes out every month and I'm really happy to share "Rooted Love", the new February collection, with you today!


This paper was great to use as a base for a mixed media layout.  It is very thick and strong.


I started out by designing my layout around the theme of a challenge that I wanted to enter it in.  Over at More Than Words this month, the theme is "Together" and you are also asked to use the ampersand "&" on the layout.  


I  used several of the journaling cards, to fussy cut images and sayings that I wanted to put on the layout.  I totally fell in love with the one that says "The greatest gift our parents gave us was each other".  This really fit the photo of my grandchildren that I wanted to use.  


Knowing that I wanted to title this "Roots and Wings" made the selection of paper easy. 

If you know that you're going to put a lot of layers of ink and mists on your layout, I would cover the top sheet in a coat of clear gesso to help the paper stand up to all the water.

Once the gesso is dry, ink or mist a stencil over top.


Next, you want to mat your photo with a variety of journaling cards that enhance it.  (The girls make it easy for you, because everything goes together SO well.)  A piece of scrap cardboard does an excellent job of lifting the mats up to give some depth to the layout.


At this point you want to choose paint and mist colours that are going to complement your layout and your photo.  

My photo had a lot of browns, yellows and greens in it, so I wanted to add more of that to the layout.  
Make samples of any embossing powders you are going to use.  It helps later on when you're trying to decide where to add it.  These two that I used are also Wild Whisper products:  Fractured Ice and Verdigris Sparkle.  You can see in the second photo above, that I also used a scrap piece to try out the colours I was thinking of using.... some of them got tossed once I saw them down on paper!

When making flowers that you want to coordinate with a mixed media layout, use some of the coordinating papers, such as this journaling card above.  Spray it with the same inks that you used in the body of the layout and cut out the flowers.  (This Spellbinder die by Donna Salzer called "Rose Creations" has always been one of my favorites.)


Glue some Fractured Ice embossing powder on the flower petals to take them "over the top"  (a versamark pen really makes this job easier).


These flowers are SO pretty in real life.


Making your own embellishments is very satisfying.  Wild Whisper has both chipboard pieces and wood veneered pieces.  These wooden feathers came from the Nature Mix.  

If you are going to paint them, put a base coat like White Crackle Texture Paste on first.  Then add your colour medium... Gelatoes were used here.  They are applied dry and then you smooth them out with a little water on a brush or your finger.


To finish them off, add some of the Verdigris Sparkle embossing powder here and there.  Other embellishments used on the dream catcher, were wooden veneer hearts and cork heart confetti.


I'm going to show you the layout again, while I briefly explain how you can create a background like this.   After you ink a stencil over top of the paper, add different layers like another stencil using texture paste.  (I used a heart stencil from Heidi Swapp.)  Things like the border of cork hearts add another layer of visual texture.  Glue down your photos and embellishments.  Add colour with mediums like gelatoes, mists, watercolour paints.  Glue down art stones and cork hearts for texture.  Add some Fractured Ice embossing powder over and around the art stones.  Spray some coloured mists over the whole layout... alternate between misting and shaking droplets on it.   (Protect your photo first!)   Water down white gesso and using a paint brush, splash the whole layout . 

Doing a mixed media layout can seem intimidating, but just have fun with it.  If you don't like something, you can always paint over it with white gesso and start again!  Making yourself sample cards of the materials you are thinking of using, really helps to prevent errors in colour choice.

I hope I've inspired you to check out Wild Whisper Designs, and maybe try a mixed media layout too!  I will be back later in the month with a second project for Wild Whisper... and you never know I might sneak some cards in too this month.  :)  Hope you'll check back to see more.

Thanks for stopping by today!

Linda


Sunday, February 5, 2017

Valentine Card

Hi there!

This past week I played along with Mojo Monday!


I created the lacy mat in Cricut design space by cutting and welding here and there, and also found the doily with hearts there.


This pretty little floral flourish is from a CTMH set called "Hello Lovely".  To make the gold foil ribbon, I cut out several layers of cardstock, glued them together, and covered them with a piece of gold foil tape.  The beautiful heart underneath is from Unity Stamp Co... "When You Smile"


I finished off the inside of the card with another pretty CTMH stamp set, "Heartfelt Hello".  

Thanks for stopping by!

Linda