Welcome Everyone!

Remember to "click" on all pictures if you'd like to see them a little closer.
Showing posts with label Creative Scrapbooker Magazine. Show all posts

Wednesday, July 24, 2019

Edmonton Summer Rock Cirkus 1979 - Wild Whisper "Feel the Beat"

Hi everyone!
Boy I had fun with this layout!  What a trip down memory lane!!

On August 23, 1979 Edmonton hosted the first outdoor concert in Alberta, at the brand new Commonwealth Stadium.  There was a lot of worry among stadium officials about having this concert in the new building, and the promoters weren't sure just how it would go over with Albertans. 
Well.... it was a stunning success with over 50,000 music lovers showing up to rock & roll... and my husband and I were two of them!!!  Peter Frampton & Heart were the headliners, but it was the Canadian band, Trooper, that stole the show.  Their version of the "Summertime Blues" had the whole audience on their feet.

Tickets were... wait for this... $20!  Oh yeah... things were good back in the 70's!  

To start with, I used this piece of paper from "Feel the Beat", and covered it with Glass Bead Gel through a 12"x12" star stencil.

Here's a close up of the gel... I love its grainy texture.

After gluing down the focal piece that I made at this Wild Whisper post, I splattered the background with watered down gesso.  I was very liberal with it and was going for big splashes.  The brush I used was this one by Tim Holtz.
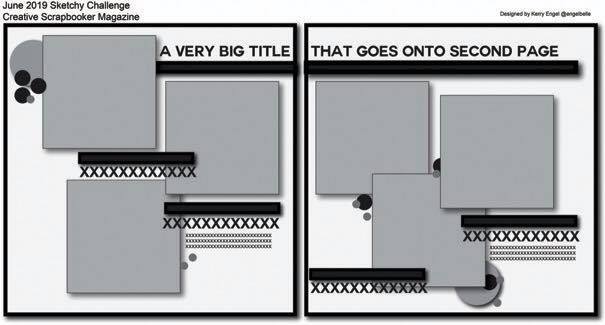
Continuing on, I used the July sketch from Creative Scrapbooker Magazine to lay out my photos.

I liked the inner border shown on the sketch, so I drew a freehand one with a black marker and added musical notes all around.  
All embellishments for the layout came from the "Feel the Beat" Ephemera pack.

Creating a layout like this is why I love scrapbooking so much.  I was literally transported while I worked on it, to a very hot, sunny, August day in 1979, when Edmonton came alive to the beat of Rock & Roll and I was there!

Wednesday, June 12, 2019

Illuminasia

Hi everyone,

Welcome back!  Today I used the Wild Whisper "City Lights" collection on a 2nd project. 


To create this double page layout, I used Creative Scrapbookers June Sketch.


The word pages were cut 9x12, the green photo mats were 4.5x4.5, the blue mats were 4x4, and the photos are 3.5x3.5.  I used word strips at the top and bottom of the word pages, and the title was cut out on my cricut.


In 2015 the Calgary Zoo hosted the Illuminasia Lantern & Garden Festival that featured 366 handmade Chinese lanterns.  It was incredibly beautiful and the City Lights paper collection was perfect to highlight all the amazing colours.  My grandchildren were 9, 5, and 1 years old.  The two oldest ones had great fun posing in front of the lanterns, while the littlest one was mesmerized by the lights!


We were at the Zoo to celebrate my daughter Melanie's birthday.  


I kept the embellishments pretty simple on these layouts and just used some of the City Lights flair buttons here and there.


Except for this guy!  This is another cricut cut using the yellow paper from the Back to Basics collection, which I blinged up with sequins from the Talk Foodie to Me collection. 
If you haven't been to the Calgary Zoo, aside from the fabulous animals, they also have a Prehistoric Park full of very realistic dinosaur robots that breathe, move, roar, and even blink when you walk up to them.  My grandchildren love them!

The Chinese lanterns were just incredible and it was a beautiful, out-of-this-world experience to walk through the dark zoo full of glowing, life-sized animals!

I love the bright colours in City Lights, and the city names that we Canadians are familiar with!
Thanks for stopping by!
Linda


Thursday, June 1, 2017

Adventure

Hi everyone!

Now that the summer edition of Creative Scrapbooker has hit the news stands, I am thrilled to share that the girls from Wild Whisper Designs had me create a mixed media layout for them, to go in the magazine's promo about them.  (They made the "Must Have List" ....Page 87... way to go Suzy and Heather!!!)

The paper collection that was being featured was "Adventure" and that title lead me to the picture that I used.... one of my son climbing in the Rocky Mountains with his wife, Liana.  I am terrified of heights and this picture makes me shiver, but I am in awe of the excitement and fun they share on their hiking trips together.


I used many products from Wild Whisper Designs' online store, as well as some of Finnabair's Art Ingredients, and I will list them at the end of the post.

There was lots of distressing, misting, painting, gluing, as I made this... but rather than go through and explain all the steps, I took many photos so you could see up close what I did, and all the layers and dimension that are on this page.  Just click on the photos and they will enlarge on your screen.

  I would like to add, that Wild Whisper Designs' paper is so thick and strong, that I didn't need to back it with anything and there was a LOT of gluing and misting!  
One sheet held it all!


One of my favorite parts of this layout is all of the beautiful chunky pieces of birch bark that I used to embellish it with.  I snagged them from Michael and Liana's pile of firewood one afternoon and trotted home as happy as a dog with a bone!


To glue all this heavy stuff on, I used Finnibair's Heavy Body Gel, and it was incredible.  Everything is stuck on there good and tight.  

Because Wild Whisper Designs is using this layout as part of their travelling display right now, I also painted everything with a heavy coat of 3D Matte Gel to keep the stones, etc from coming loose, and it has worked like a charm!  

Can't say enough good things about these two products... they won't let you down if you need something to stay STUCK and it's flexible at the same time!


That awesome bear was cut from one of the Adventure Journaling Cards.


The pinecones were also from Wild Whisper... very intricate laser cut wood.  They're unfortunately sold out now.  (I'm telling you, you have to snag things off their site ASAP, they're so popular!)


To keep the layout organic and earthy, I used burlap and fish netting as trims.


Another peek at the bear .... LOVED him!


Did I mention Wild Whisper also carries fabulous embossing powders by Emerald Creek???


Did you happen to notice he only has a rusted chain to hang onto???  
This mother is averting her eyes!


Yup, there we are... right there... page 87!  Thank you to Creative Scrapbooking for this opportunity.  

If you haven't picked up your issue yet.... you need to .... it is jammed packed with fabulous art from front to back... and lots of tutorials and good info too!

Thank you so much for stopping by today!

Linda

Supplies Used:
Emerald Creek Embossing Powder - Verdigris Sparkle and Charred Gold
I created all the ferns with Spellbinders Ferns Etched Dies
Various sprays from Lindy's Stamp Gang that I had on hand.


Monday, February 20, 2017

Two People, One Love

Hi everyone,

I'm back today with another project that I have done for Wild Whisper Designs.


I decided to use the Rooted Love paper to create a wedding layout.

I started with the February sketch at Creative Scrapbooker Magazine.

When I'm using a sketch, I always go to Cricut's Design Space to work out the proportions of my paper and then to cut the pieces.  Below, I'm showing you the Cricut design, and the base of my layout after it's been cut on the cricut.


To embellish the layout I used my set of Heartfelt Creations Blushing Rose stamps and dies.


I only needed 3 ink pads and a waterbrush to watercolour everything.  If you haven't tried it, it is a lot of fun.  I take the ink pad and swipe it on my silicone mat and use it as a paint palette.  Because I wanted the leaves to blend in with the beautiful aqua colours of the paper, I chose a Lagoon colour to paint them, instead of a traditional green.


On the picture above, you can see where I painted double layers of the bigger flowers and glued them on top of each other to give the layout dimension.  That fabulous wooden "love" and the hearts are Wild Whisper products.


I used a pretty package of  Wild Whisper sequins in the centers of the flowers and scattered around the page.  They really add a pretty sparkle.


I cut the bird from one of the papers.


Another close up of the flowers with their sequin centers.


A tip when you're using a stamp set to embellish.... stamp LOTS of images so that you have plenty of leaves and flowers to work with.  To make the flower frame above, I not only used full stamps, but I stamped extra pieces and snipped off extra leaves and bloom to fill in here and there where I felt the layout was a little sparse.  That way you get a lush, fuller flower wreath.

I hope I have given you some ideas on how to use the Rooted Love papers during my guest month as a designer with Wild Whisper, and shown you how versatile they are.

I have truly enjoyed working with these papers, and a big thank you to Suzy and Heather for the opportunity!

Watch for their next paper collection in March!

Thank you so much for stopping by!

Linda