Welcome Everyone!

Remember to "click" on all pictures if you'd like to see them a little closer.
Showing posts with label challenge. Show all posts

Wednesday, January 27, 2016

Can you do a Layout in 30 Minutes????

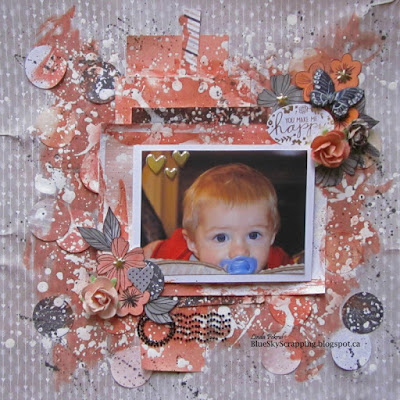
The challenge that I did today, was fun….TOTALLY fun….even though I had to prepare for it like I was going to attempt to climb Mount Everest! 


Sherri, our SGC host at Swirlydoos this month, felt we too often use the excuse of “no time” to not do any creating, and she wanted to show us that we CAN create something in only 30 minutes.  Yes… you heard correctly… we had 30 minutes to create a layout!  Now if you know me, this was a HUGE challenge!  I’ve been known to dither over flower arrangements for over an hour… let alone all the other elements of a layout. 

Disclaimer:  After each layer of gesso and painting, I DID stop the clock while I threw the layout in the oven at 200 degrees to dry.  Once it was dry…the clock was re-started. 

I mulled this challenge over for a long time before attempting it.  LOL.  My first step was to study a video done by one of the designers at Swirlydoos, Cindy Brown, who claimed to love doing layouts in 30 minutes.  If you’ve seen Cindy’s work, it’s awesome… so that’s where I headed first, to see how she creates her magic… and yes… I might have watched her video 4 or 5 times before I felt confident enough to begin!  

My second step, was to use all the leftovers from the layout I made a couple of days ago.  You can go here to see it.  I figured I was being pretty clever with this idea… because I already had practiced putting the flowers together in clusters on the other layout.  Oh yes… I’m a sneaky one!

So I gathered all my supplies close to my craft mat, set the timer on my phone, and began.  Cindy has a very cool technique in the video for creating a layered mat under your photo and I began with that.  In her video she also uses some circle stickers on the background, so I used a punch to cut out circles from my scraps… oh such a time consumer that was!  I kept glancing at the timer, watching the seconds steadily ticking by.  Be still my pounding heart!

When circles and mats were glued down, the fun began.  Cindy creates an awesome effect with watered down gesso (which I had already prepared) and I couldn’t wait to try it.  I grabbed my brush and flicked and waved it with gay abandon… I loved watching the big white splotches explode everywhere!  To my woe though, I discovered when I was done, that my craft mat wasn’t big enough to contain ALL that gay abandon, and watered down gesso really FLIES through the air AND I hadn’t covered my wooden dining table.  More precious seconds ticked by as I grabbed baby wipes and frantically scrubbed down splatters of gesso that were everywhere!  


To get the soft peach look on my layout, I used my CTMH watercolor paints.  I find that #10 from the top is the perfect shade for the Charlotte paper pack.

Time was now running out on me, so when I got to the flowers, I threw the glue on them and smacked them down anywhere… it didn’t matter if two orange colored ones were side by side, it didn’t matter that I got a little extra glue on the journalling chippy and it looked sloppy, it didn’t matter if they didn’t look totally “balanced”… I just needed to get those suckers down there before that clock stopped ticking!


And you know what????  I did it!  I did it and I had great fun doing it.  (I mean who doesn’t love a little adrenalin rush???)  Not only that… I LOVE this piece…. And I feel like an artist!   

This is why I love scrapping challenges… they take you outside your comfort zone …. And they teach you something new!  

If you would like to see how some of the other girls handled this challenge, go here.

Much thanks to Cindy for the time she takes to put tutorials together, and the inspiration that she shares so readily!  You can see all of her videos here.


Thanks for coming on this adventure with me…. I hope I have encouraged 
you to try one of your own!

Linda
Friday, March 15, 2013

PPC108 - Playing in Paradise Challenge


Good morning everyone!  You are going to enjoy the challenge over at Playing in Paradise today!!  Dawn is hosting and she has asked us to share our favourite colour, technique, style, tool or embellishment.  Please tell us about them and use them in your project.  How fun is that???
PPC #108
I learned an inking technique from Kittie Caracciolo called the Belleek Inspired Technique; that I just love, so I chose to make a card that incorporated it.  Here is a link that explains the technique in more detail.  I made this card for a friend who is longing for Spring, so I used bright, happy colours instead of the more pastel/white colours usually used in the Belleek Technique. 

 
Here's a quick picture tutorial.  Ink the flat side of an embossing folder with a brayer.  (I used the Sizzix Flower, Owl, and Pear folder from my stash.  A similar folder can be found here.)  Insert a piece of white cardstock and emboss.  (Be sure to clean your folder right away.  You probably won't want your next project to be pink!)
 
 
Next trim your piece of embossed cardstock to fit your card and mount it. 
 
 
Now you're ready to embellish.  Even though I used bright colours, I still wanted to mute them a little to match the embossed background, so I took a dry fan brush, dipped it in gesso and then lightly swiped the flowers with it.
 
I found a poem that suited the card and framed it using Spellbinders Resplendent Rectangles.  We don't have these in the store right now, but the Romantic Rectangles are equally lovely.  (They're on my wish list!)  When using these intricate dies, you will find that this set of tools from Cheery Lynn, will make the job of getting the cut piece of cardstock out, a lot easier.
 
 
I made the leaves for the card using Spellbinders Foliage Shapeability Die and the butterflies were made with a punch from my stash.  It's a Martha Stewart one.  The lace trim is also a Martha Stewart one from my stash.  The flowers are an older line of Prima, which are still available in the store in the colour tones of blue.
 
 
Remember: Everyone is invited to play at Playing in Paradise! There are no requirements or restrictions on what products you can use to create your challenge entry. All we ask is that your project is new to our challenge. Projects that have been previously posted will not be eligible for the prize draw. Head over to Playing in Paradise! to see Dawn's blog post, and for instructions on how to enter your project.  You will be in for a treat because the rest of the design team will be sharing something that is a favorite of theirs too!  (To visit their blogs, just "click" on their names!)

So come on over and play! It's a lot of fun. The prize that's up for grabs this week is a stamp from The Sweetest thing Stamp, coordinating Chipboard, 2 stickers & Die Cuts.  What a lovely prize package!  You've got to enter to win, so what are you waiting for????


Products that can be used to make this card:
 

Friday, March 1, 2013

PPC106 Playing in Paradise Challenge


"Top Of the Morning to You!"  It's Friday ... it's March 1st ... and we have another challenge 
for you over at Scrapbookers Paradise!

PPC#106

Jessi is the hostess this week and she is challenging us to use the colour green.  It can be something to do with St. Patrick's Day, but it doesn't have to, just make something with green as the focal colour!

In our family, we are always reminded of our Irish roots on            St. Patrick's Day.  My Great-grandfather came from Ireland and worked as a blacksmith, a trade which my Grandfather also loved and worked in for most of his life.  So of course, I wanted to make something to celebrate St. Patrick's Day.  I didn't have to look far, I still have some Graphic 45 "Place in Time" on hand, and the March page had some perfect images for making a card.  I decided to make an easel card that can sit on the counter as a pretty little decoration during the month of March.


Making a 6"x6" easel card is quite simple.  Start with a piece of cardstock that is  12" x 6" and score it at 3" and 6".  Cut another piece of cardstock 6" x 6".  This will be the piece you decorate for the front of your card.  You glue it to the top of the scored cardstock as shown below.


The last little piece you need to make, is to glue some sort of decoration at the base of the card to give it a "lip" to sit against in order that it doesn't slide down.  On my card, the stick pin is holding the top in place.


One last little thing I did on this card was to alter the flower at the bottom.  I felt the flower needed a little more depth, so I took a Copic pen and lightly shaded around the center.  You can see in the pictures below, where I started shading the flower, and the second one shows it completed.


So now I'm ready for St. Patrick's Day!  I really hope you will join us in the Playing In Paradise Challenge this week.  Click here for details on how to enter your project, and be sure and check out the projects that have been created by the rest of the design team!

Supplies used that can be purchased at Scrapbooking in Paradise:

Graphic 45 12x12 Paper - Places in Time March Cut-Aparts     

I leave you with this Irish blessing:

May you always walk in sunshine.
May you never want for more.
May Irish angels rest their wings right beside your door.

Till next week,
Linda


Friday, February 8, 2013

PPC 103 Playing in Paradise Challenge

Good Morning everyone!!

It's all about LOVE at the Playing in Paradise Challenge this week!


Dawn is encouraging you to create a Valentine card, make a layout about someone/thing you love, anything that has something to do with love!  I decided to take the opportunity and make my husband a card, however it turned out kind of "girly" with all the flowers and sparkle, so I've decided to use it as a decoration for the mantle instead!  The wonderful Sizzix Accordian Album Die as well as the matching Bracket Frame and Label Die worked perfectly for this!
 
 
It will be a great die set for making mini albums also!
 
The doily mats were made by using a doily stamp from my stash and embossing it.  Then to make the chipboard letters black, I painted them with black gesso and clear embossed them.  This gave a very textured embossing pattern that I wasn't expecting, but really like.  Here's a close-up so you can see a little better.
 
 
I love the paper line from We R Memory Keepers "Crazy for You".  The pinks and blacks are just beautiful.  I used a few stickers from Authentique's "Lovely" line for embellishments on the front, but I see the store is out of that right now.  However, Pink Paislee has a really cute sticker set that would work just as well!  The flowers that I used were from Prima and my stash.
 
Everyone is invited to play at our challenges! There are no requirements or restrictions on what products you can use to create your challenge entry; items from your stash are just fine!  For full instructions on how to play, just go here.
 
This week you will be competing for a prize package of decorative tape by My Minds Eye "The Sweetest Thing" collection, as well as a package of coordinating buttons, worth a total of $20.  So what are you waiting for???  Come on over and join in!
 
Enjoy your crafting!
Linda


Friday, January 18, 2013

Celebrate!

The theme at Playing in Paradise this week is "Celebrate" as we are celebrating our 100th Challenge!  Be sure to come play with us, as there are extra prizes to be won this week in honour of the occasion.

My card was made to celebrate my son's birthday!


This Tim Holtz clock die, was a new toy tool that I had just purchased so I was anxious to try it out.  I made the sign from the clock hand and used the image as a frame to hi-light the date of the wonderful day my first baby was born!

Enhancing the frame and hand was pretty easy.  I went over it with an Emboss It Dabber, which made it nice and sticky, to apply some silver embossing powder.  Then I used my finger to dab Black Soot Stickles here and there to give it a distressed look.   I then embellished it with a couple of pieces from the Tim Holtz Foliage Embellishment pack.  These are great when you want an embellishment with a more masculine feel.  

The Playing in Paradise Challenge has only two rules:  1)  Follow the theme of the challenge.  2)  The project needs to be new to Playing in Paradise.  The winner not only wins a wonderful prize package, but also a chance to be a Guest Designer at Playing in Paradise for a week if they wish to.  How awesome is that!

Look at the wonderful goodies you could win this week:

Grand Prize:


2nd Prize:


3rd Prize:


So what are you waiting for????  Click on the hi-lighted link to come Play in Paradise this week!!!

See you there,
Linda


Friday, January 11, 2013

Oh my gosh ... I'm excited!!


Hi everyone,


Today is a very exciting one for me, as I've been invited to join the 

This is a weekly challenge that begins each Friday. It is open to everyone and the only rule is that you follow the theme of the challenge. Up for grabs each week is a prize package of scrappy goodies, as well as a chance to guest design if you would like the opportunity.  How great is that!!!


My challenge's theme this week, is to make something that hi-lights a special "Place in Time" 
that you remember or that you have coming up in 2013!  
It can be a card, layout, tag, even an altered item .... whatever you choose!  

I chose to use the beautiful paper line from Graphic 45 called "Place in Time", as I wanted to make a mini-album to record the important events of 2013. (If you click on the hi-lighted links, you will be able to see these products at Scrapbooker's Paradise.
This album was inspired by Tonya Gibbs and if you would like to make one, 
her tutorial can be found here


I started my mini album by making and decorating a front and a back cover from chipboard. I used 4 pieces of 12"x 12" Place in Time paper to make these covers, as well as a piece of the coordinating Place in Time Chipboard #1. (That's where I got the beautiful picture of the birds.) The rest was all pieces from my stash. I stamped the crackle image behind the pictures and went over the swirls with Glossy Accents 
to hi-light them.


 Then it was just a matter of cutting the album pages from black card stock and decorating them. 


I made 12 pages and used the Place in Time 8"x8" paper pad to decorate them.  


Each page folds out to add photos to the back side, and then there are pockets with tags on the front side, to add additional photos or journaling notes.


Tip:  To make the chipboard covers, I used the wide Sookwang Tape.


It made gluing down the papers a piece of cake!!

So now what you need to do, is head on over to the Playing in Paradise challenge at Scrapbooker's Paradise, and check out the other pieces of inspiration 
from the rest of the team. 
Then join in and play along with us - you'll have a lot of fun!

Linda