Welcome Everyone!

Remember to "click" on all pictures if you'd like to see them a little closer.
Showing posts with label Wild Whisper Design Team. Show all posts

Wednesday, July 29, 2020

Wild Whisper Christmas Coffee Tin

Hi Everyone!

I'm up on the Wild Whisper blog today with a project that is a continuation of Karla's Christmas in July theme! You can see her project that uses the same piece of Sensations paper here. We both instantly thought of Christmas when we saw this sheet!


I chose to upcycle a coffee tin and turn it into a beautiful container. This container could act as a gift box, or it could sit on your counter at Christmas time and hold gift tags, tape, stamps, etc. I also found that it holds a dozen or more A2 size cards, so if you're a cardmaker, and you like to gift a package of cards at Christmas time, you could tuck them in this can and you'd be done!

My coffee tin was 19.5" in circumference and 5-5/8 + 1/16" tall. This allows you to cover the exterior of the tin with one 12x12" sheet that is cut into two pieces. I used a second sheet to cut a small circle to cover the lid.


I love to pick up Christmas florals on sale, so I always have a bouquet in my stash that I can cut into and pull out pieces of this and that for decorating projects.


Pieces from the photo above were used to decorate the lid of the coffee tin.


To add the bells, I tied them to a piece of ribbon, folded it in half with one end longer than the next, and glued it under the bow.


If you compare the photo above, with the one below, you will see that I started out with the idea of spacing pointsettias around the tin. Once I added the gold pom poms to the top and bottom I decided I wanted to remove the poinsettias and let the prettiness of the ribbons be the focal point. There was so much going on on the lid that it felt to me that the poinsettias made the whole thing too busy. Luckily for me they were attached by brads, which made removal easy!


This is a quick, simple project that makes use of something that would just go in the garbage. It is great fun digging into your stash to decorate it as well. (Some of these ribbons I have had for years!) 

Be sure and use my coupon code if you go shopping at the Wild Whisper store! DTLINDA

Happy Creating!

Linda

Wednesday, May 27, 2020

Wild Whisper - Happy Tails Mini Album

Hi everyone,  Today I'm sharing a cute little project over on the Wild Whisper blog using the Happy Tails collection.

Starting from the age of 4, I have been blessed over my lifetime to have shared and continue to share, my life with many different pet dogs.  They have all been special and each one has taught me new lessons. 

This paper collection is so cute, that I decided to make a mini-album containing my favorite photos of each dog.  Not all are mine, but I have loved the dogs my parents had, and also my daughter's current dog, so I have included them in this album as well. 

*Note... I have chosen to focus on the dog themes in this collection, but for all you cat lovers there are many pieces and papers that you could use for your favorite cat friends as well.

I was inspired to make this album, by one that was done by Paige Taylor Evans.  You can see hers here.  I have shared all the cutting instructions for mine, over on the Wild Whisper blog, so if you would like to make one of your own, you can check out the details there.


Some of the pages I have left blank to fill in with photos later.


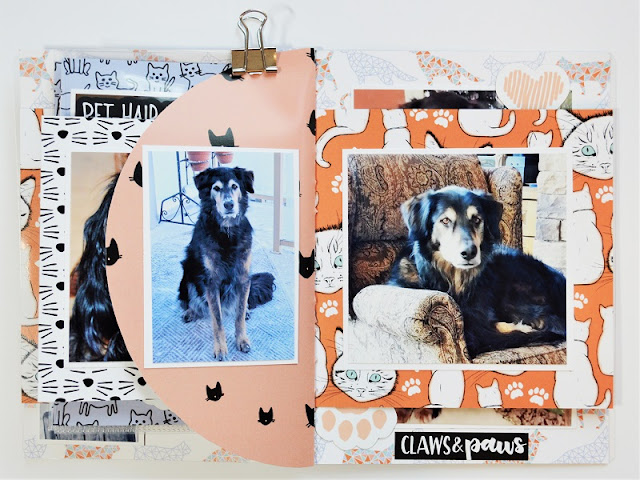

So there you go... I've managed to fit 6 decades of family dogs into this little album!  It is great fun to browse through it and remember all the good times.

Thank you for stopping by today.  As usual, if you should do any shopping, get yourself a discount by using my code:  DTLINDA in the coupon box!  I think this mini album would work for ANY of the Wild Whisper collections.

Happy crafting!

Linda

Wednesday, February 5, 2020

Faux Mixed Media cards... You'll Love How Easy They Are!

Hi everyone,
These cards might look like I spent all day painting and working with alcohol inks... but thanks to Nicole Wright... I didn't!
                                                                                                                                                            I used the following sheet of paper from Nicole's Mixed Media Assemblage paper collection, to create focal points for all four of my cards.
                                                                                                                                                    Nicole describes this paper as being made for layering extra paint and mixed media elements on top, so I started by splashing my card pieces with a little bit of gesso.  *hint... the packing box that Wild Whisper's paper comes in is perfect for small jobs like this!

This first card I created by heat embossing Nicole's beautiful Botanic stamp set with clear embossing powder.  (I meant to use white!)  Once I realized I had used clear, I needed to think of a way to bring out the flowers on the stamp.  I took a white chalk marker I had on hand and coloured the parts of the flower, and then I went over it again with the same marker, using a dabbing motion to get the "dotted look".  It turned out to be one of those "happy accidents" because I really liked the effect when it was done!  The front panel is popped up to give it some depth.


This second card is clean and simple.  I accented it with Strength of the Season sequins and some pretty purple foil mirror card that I had on hand.

                                                                                                                                                            Isn't this paper pretty!  It stands on its own with barely any embellishing.  (Of course more sequins from Strenth of the Season did add some sparkle!)
                                                                                                                                                      This following card, made use of some flower bits I had left over from this project.

                                                                                                                                                    These cards are all 4.25"x5.5", so they didn't use up much of the patterned paper.  I still have lots left to make more cards... maybe you'll see that white embossed one yet!  ;)
Thanks for stopping by today.  If you've caught my enthusiasm, and NEED this paper collection, don't forget to use my code: DTLINDA in the coupon box for a 10% discount .  Shop here.
Happy creating!

Wednesday, December 11, 2019

Play Like You're in the Big Leagues

Hi everyone,
Today I'm back to using the Canadian Winter paper collection because it's winter time in Canada, the hockey season has started, and my grandson is so gosh darned cute!  *Big Grandma smile here.*
First game away for this 5 year old, and don't cha know you gotta dress in a suit and tie the way the NHL players do?


For this layout, I decided to use a sketch by Page Maps.  I'm going to put it in an 8-1/2"x11" album, so I thought this sketch would be perfect.

Because I didn't want Greyson's hockey bag to be covered by the embellishments, I flipped the sketch in my Publisher program, and layered my photo over top to figure out what size it needed to be printed at.


Then I decided to throw another couple of photos in.  Since I print my photos at home, this helps me to save on paper and ink, by having everything sized down to the dimensions required before printing.  (This is all still on my computer screen.)


Here you can see the photos after they came out of the printer.  I threw an extra one on to use up the bottom of the paper.  (I have a very specific layout planned for THAT one!)  LOL


Here's the base of my layout.


The base with photos.

The finished layout with embellishments from the ephemera pack.

The thing I like about sketches, is that if you're mojo is totally gone, they give you a point to start at... and then the rest starts to flow as you work.  

I hope this little tutorial might have helped a little when you're using a sketch.  You change a few things to suit the style of picture you have, and the type of embellishments you're using... the point of a sketch is to get you started!
Happy creating!
Linda

Wednesday, August 14, 2019

Fandom Birthday Card

Hello! 

Today I thought I'd share a birthday card that I made for my dad.            
He is a prolific reader, so I thought this quote from the Fandom collection was perfect for his card!

The front of the card was created very simply, using Fandom ephemera and a piece from the paper collection.

I popped up some of the ephemera pieces with foam tape.

I made use of more of the ephemera pieces on the inside of the card.

Cardmaking doesn't need to be hard when you've got patterned paper and ephemera pieces!

Wednesday, April 24, 2019

Easter Day

Hi everyone!
Our family had a fabulous Easter Day, as I hope yours did as well, and we ended up taking a group picture which I wanted to document in my layout today.  

I decided to use Creative Scrapbooker Magazine's April sketch and the last of the paper from my Floral collection package.


I flipped the sketch around a bit and decided I liked this arrangement for my larger photo.  I have a Cricut file that I used to cut the circles and titles.  I made it shareable and the link is here if you would like to use it.

Here's a closer look at the title.  I used pieces of the Back to Basics collection to create the first couple of layers of it, and then Floral scraps for the rest.

For the embossing on both the title piece, and around the photos, I outlined everything with Glossy Accents, sprinkled it with Blue Island Slush embossing powder and heated it with my glue gun until it bubbled.  That gave it a cool, distressed look.

The pretty butterflies are from a file that Lisa Gregory made for us at the Swirlydoos kit club a few years ago.  I print them on matte photo paper, fussy cut them, and colour their edges black.  I thought this set coordinated nicely with the Floral collection.  Lisa still shares her beautiful butterflies on her blog "What a Beautiful Mess".  I've also created a link here for the file below that you can download to your computer.


This beautiful succulent was popped up on foam dots to add a little dimension.

*Tip:  Sometimes when you get done your page... it doesn't look quite right.  In the photo on the left, I didn't like how the circles blended together and didn't look like circles anymore.  I took a black marker and outlined the circle, making it darker on the inside and blending it out like a shadow.  This gave me back my distinct circles again.  While I had the pen out, I went around all the outer edges of the background papers and did a "faux" stitch on them.  

There's still a week left in the Wild Whisper April Challenge, share your Easter photos with us in a floral theme and earn a chance to win a double pack of the Floral collection!  

Thanks for checking out the blog today!