Hi everyone! Welcome back!
Today, I'm sharing an A2 Triple Pop Up Cube card that I created using the new Wild Whisper collection "Play in the Dirt".

I've seen a lot of different varieties of the Triple Pop Up Cube Cards, but I liked this version where the two smaller boxes are different heights and widths, so I went with it. This video is the one that inspired me to make this card: https://www.youtube.com/watch?v=U3qlnPXN09A&app=desktop
These cards look complicated, but they are based on the simple principle of gluing 3 different boxes together. I used Bazill's heavyweight 100lb cardstock for the card bases. It is very sturdy and stands up to all the bending and folding without sagging.

I started with the tallest box first. Measurements for cutting were:
Card base - 5-1/8" x 8-1/4" - cut one. Score it at 2", 4", 6", and 8". The remaining 1/4" will be the tab that you will glue the box together with. Mitre each of the glue tab corners.
Outer patterned paper pieces - 5-1/16" x 15/16" of an inch - Cut 4
Inner patterned paper pieces - 3" x 15/16" of an inche - Cut 4.
Glue box together with glue tab on the inside of the box. Cover your box with the patterned paper inside and out.
*I made a mistake when making mine. You shouldn't be able to see the glue tab as you can in the upper corner above. Be sure and place your patterned paper on this side AFTER you have glued the box together and it will cover up that tab. I corrected this flub by fitting another piece of patterned paper over top of the glue tab but it still bugs me! :)

This photo gives you a clear view of the different sizes of boxes, all glued together.
Measurements to cut the box on the left are:
Card base - 2" x 61/2" Score it at 2", 3", 5", and 6". The remaining 1/4" will be the tab that you will glue the box together with. Mitre each of the glue tab corners.
Dark coloured patterned paper pieces: 1-15/16" x 1-15/16" - Cut 2.

This photo gives you a clear view of the different sizes of boxes, all glued together.
Measurements to cut the box on the left are:
Card base - 2" x 61/2" Score it at 2", 3", 5", and 6". The remaining 1/4" will be the tab that you will glue the box together with. Mitre each of the glue tab corners.
Dark coloured patterned paper pieces: 1-15/16" x 1-15/16" - Cut 2.
Dark coloured patterned paper pieces: 1-15/16" x 15/16" - Cut 4.
Light coloured patterned paperpieces: 1-15/16" x 1-15/16" - Cut 1.
Measurements to cut the box on the right are:
Card base - 2" x 61/2" Score it at 1-1/5", 3", 4-12", and 6". The remaining 1/4" will be the tab that you will glue the box together with. Mitre each of the glue tab corners.
Dark coloured patterned paper pieces: 1-15/16" x 1-15/16" - Cut 6.
Measurements to cut the box on the right are:
Card base - 2" x 61/2" Score it at 1-1/5", 3", 4-12", and 6". The remaining 1/4" will be the tab that you will glue the box together with. Mitre each of the glue tab corners.
Dark coloured patterned paper pieces: 1-15/16" x 1-15/16" - Cut 6.
Light coloured patterned paper pieces: 1-15/16" x 1-15/16" - Cut 1.

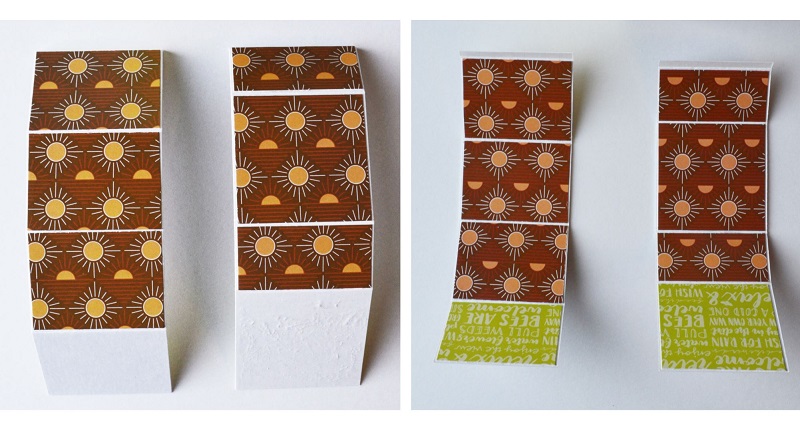
I found it easier to glue on all the patterned paper pieces, before I glued the smaller boxes together. This time the glue tabs can be glued on the outside, as that side will be the side that gets glued to the tallest box. (That's why there is no patterned paper on one side of the box - that's the side that glues to the tall box.) The left photo above, is the outside of the boxes. The right one is the inside of the boxes.

Glue your boxes together and glue them to the taller box as shown above.
Now the fun starts, as you begin to decorate your card. I found it was just like arranging furniture in a doll house! :)


You could stop here and you would have a great card, but to make it even greater and add extra dimension, create some pop up features that sit on the ledges of the small boxes as seen below.
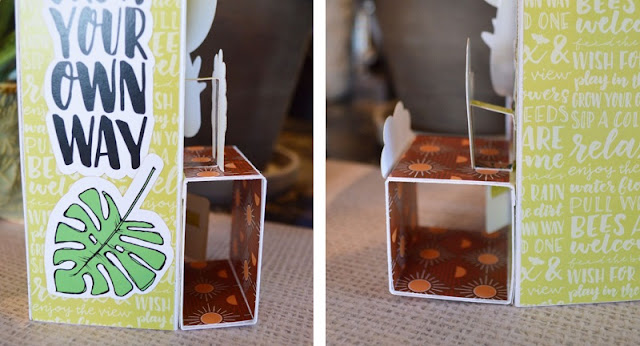


Glue your boxes together and glue them to the taller box as shown above.
Now the fun starts, as you begin to decorate your card. I found it was just like arranging furniture in a doll house! :)

I started by placing all the background images, using pieces from the "Play in the Dirt" ephemera pack. Then I added the mechanisms on the corners of the tall box, that will hold the ephemera sentiments.

You can see a closer look at the mechanisms above. They are super simple to create. Mine are 1/4" x 1". Cut two, fold them each in half, and glue one on each side of the corner as in the photo. This leaves you with a flat surface to glue the 'Urban Jungle" and "Home is Where the Plants Are" ephemera to.
You could stop here and you would have a great card, but to make it even greater and add extra dimension, create some pop up features that sit on the ledges of the small boxes as seen below.

The mechanisms that you need to do this, are very simple to make.

I started by cutting 1/4" strips of paper. Score at 1/2" to create the tab that you will glue to the ledge. Then figure out how tall you want the portion that will glue to the piece of ephemera, score it at that point. Score it 1/2' from there, and score it again for a quarter inch glue tab that will attach to the tall box.

It's quick and easy to do, and gives your card a very dimensional look.

When you're gluing on your ephemera, don't forget the bottom of the boxes!

This is why.... the bottom folds up to flatten the card, and you still have a pretty card in the flattened stage! The size at this point is 4.25" wide and 5.5" tall.

I added one of the border strips to the top of the box to give it a more finished look.

Last but not least, the above photo shows the back of the card. The left side is where you could add a piece of cardstock to write your greetings on.

Whew! You've done really well if you've made it to the bottom of this tutorial!! I hope you give this type of card a try. They are a lot of fun to do!
If I've put you in the mood for shopping on the Wild Whisper site, enter my design team code (DTLINDA) in the coupon box for an extra 10% off your purchase!
Happy creating!
Linda