Welcome Everyone!

Remember to "click" on all pictures if you'd like to see them a little closer.
Showing posts with label Christmas cards. Show all posts

Wednesday, November 18, 2020

Wild Whisper - All is Calm

Hi everyone,

I pulled out my Wild Whisper Christmas stamps... Christmas Comfort, Woodsy, Home for the Holidays... and combined them on a pretty, sparkly card today.


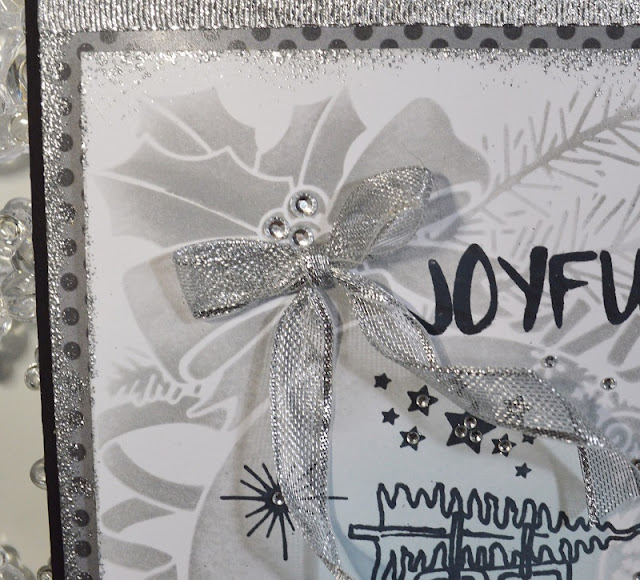
I used them to create a scene within this pretty Christmas Snowflake Bauble stencil from Sweet Poppy Stencils, which was sponged with Hickory Smoke and Tumbled Glass distress oxide inks. 


I then took a piece of paper from an old collection called "Small Patterns", and to sparkle it up and make it Christmassy, I embossed the edges with Ranger's Silver Tinsel embossing powder, and trimmed it with a sparkly silver ribbon.


Above, you can see how I also embossed the edges of my stamped image with the same silver tinsel embossing powder.  To make it sparkle even more, I added CTMH clear gems here and there.


The finishing touch is a beautiful bow.


The inside is stamped with the sentiment from Christmas Comfort and trimmed with silver CTMH Shimmer Trim.


I hope this has inspired you to pull out your stamps and paper and create some Christmas magic!

Happy Creating!
Linda

Wednesday, November 13, 2019

A Trio of Christmas Cards

Welcome back!  Today I've got a set of 3 Christmas cards that I made using Pam Bray's beautiful Christmas paper in the 6x6" size.

I love making Christmas cards because you get to use lots of glitter and bling! 

To make this one, I used the Pine Branch die by Tim Holtz to cut the pinecones, and the beautiful Peace stamp is from a set that is also by Tim Holtz, called Christmas Time 2.

I first embossed the sentiment with gold embossing powder and didn't feel it stood out enough.

So I embossed over the gold with black embossing powder and I really liked the shabby, distressed, black and gold sentiment I ended up with.  

I used the piece that I trimmed off, to put on the inside, and this sentiment stamp is also from Christmas Time 2 by Tim Holtz.

Season's Greetings is also from the Christmas Time 2 set.  I embossed it with black embossing powder and trimmed the sides with gold mirror card and some cute red pompom trim that I had in my stash.

I loved the deer on the porch step and decided to give him a bright red bow and some jingle bells around his neck.

Inside, I again used the trimmed off piece from the front of the card and another sentiment from Christmas Time 2.  (I really love that stamp set!)

This last card was the most work, but also the most fun!

I used a label die from my stash and cut out a portion of the patterned paper.  At the same time, I cut Merry Christmas from gold mirror cardstock using the Christmas Ribbon die set by Tim Holtz and the pine branches were cut from the same die set that cut the pinecones - Pine Branch.

I cut about 5 more pieces of white cardstock using the same label die, stacked them all up and glued them together to make a piece of chipboard about 1/8" thick.  Then I embossed around the sides and the edges as you see above, using gold embossing powder.
I re-inserted this chipboard piece into the original patterned paper and trimmed it up with the diecut pieces, as well as a little poinsettia by Prima.

For the inside of the card, I cut another label diecut, edged it in gold embossing powder and embossed Season's Greetings in red embossing powder.

So there you go!  Three Christmas cards done and an afternoon of creative fun!  I still have MORE pieces of this beautiful paper left over, so there might be a few more cards in future posts!
Happy creating!
Linda

Saturday, November 24, 2018

All is Calm, All is Bright

Hi there!

I'm back today with some more Christmas cards created with Wild Whisper Design's "Christmas Comfort" line.

First up is one I created with the two stamp sets that coordinate with the collection.


I trimmed the image with Tonic's beautiful Mirror Glossy cardstock that I am in love with this year, and added some decorative elements such as the mistletoe sprigs from the Ephemera pack, plus some bling from my stash.


A couple more ephemera pieces dress up the inside of the card.


With this card, I played with the three mistletoe stamps in the set and created a border with my Misti stamping tool.  I dressed up one of the cards from the Card Pack with more ephemera and bling.  To add some sparkle, I added glitter dots around the "All is Calm" card and to each of the mistletoe sprigs, using Nuvo Glitter Accents in "Winter Cranberry" and of course... more Mirror Glossy cardstock!


More ephemera for a quick, cute inside greeting.

                                                                                                                                                                  Head over to
that is on until the end of Monday for some real bargains!

The Christmas Comfort line is disappearing fast, however if you check 
The Paper and Ink Boutique, you will find more there!

Thanks for stopping by!

Linda


Sunday, December 18, 2016

Sea Glass Poinsettia

Hi everyone!

I'm back again to share another Christmas card in CTMH's beautiful Sea Glass colours!


This card is another SVG file that I cut on my Cricut Explore, only this time the file comes from Birds Cards who is another favorite of mine!  You can find this card file here.  

I really loved combining the Sea Glass colours and white glitter paper.


I wanted to share with this close-up, how I painted all the Sea Glass cardstock with a white Wink of Stella shimmer pen, to tone it down a bit and give it a soft look.  Add lots of crystal gems and it sparkles like the snow in winter!

Thanks again for stopping by and sharing my joy in creating Christmas things that sparkle!

Linda

Supplies used:

Monday, October 17, 2016

10 CTMH "City Sidewalks" Christmas Cards

Hi everyone,

I have made another set of 10 Christmas cards.  These ones were made using the CTMH "City Sidewalk" Workshop Your Way.

As I did in this post, I wanted to see how many cards I could make using the Workshop Your Way kits after first making the 3 double layouts.  I could have made more cards... but I stopped at 10.  There is a lot of value in these kits!


I explain how I glittered up the dark blue tree paper above, in my instruction PDF which you will get a link for below.


Thanks again Janice Gilhooley for the instructions for the snowman card!


If you would like the instructions for these cards, you will find them here. 


Linda


Sunday, October 2, 2016

10 Christmas Cards from CTMH Oh Deer WYW

Hi everyone!

Happy World Cardmaking Day!  I know the actual day was yesterday, but I am continuing on with it today!!

I used one of the CTMH workshops called "Oh Deer", cut the 3 layouts out and then went on to see how many Christmas cards I could get from it.  The answer is A LOT!  I finally stopped at 10 cards, but I could have made more and I probably will yet.


These cards are quick and simple, but very elegant.  I popped them up with a lot of layers and added extra glitter, crystal gems, and lots of shimmer to give them an extra dimension.  They are SO pretty in real life.  I hope I have been able to capture some of their sparkle and glimmer for you!

I have made an instructional PDF document on how to make these cards.  If you would like to have it to make your own cards, please go here.


This Peace card was inspired by Allisa at Rocky Mountain Paper Crafts.


And THIS one was totally designed by Janice Gilhooley.  (You will only be able to see this link if you belong to the Facebook page CTMH Artwork.)
I loved it so much I had to make one of my own!!


I hope you enjoy these cards!
Getting an early start on them now will help decrease the stress in December when there are so many things to do!

Thanks for stopping by!
Linda