The current paper collection that is being featured by
Close to My Heart consultants this month, is
Prepare to get lost in a rich and rewarding crafting adventure, as you explore new territory with the Timber paper collection. Capture the feeling of quiet moments in nature using the versatile, masculine designs of these papers, stickers, die-cuts, and stamp sets!
Timber is a big collection, so grab a coffee and relax, there are lots of photos and information to follow! I've also included supply lists below the projects that are displayed.
If you click on the hi-lighted links, you will be taken to my shopping site where you can purchase these items.

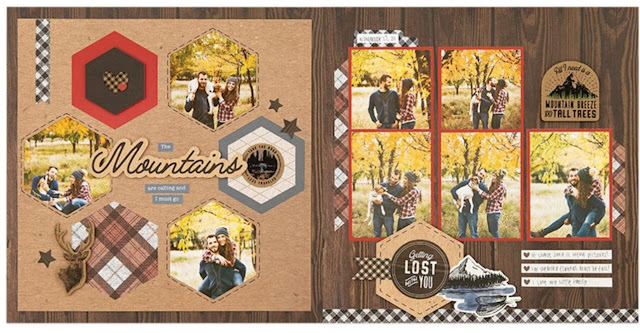
Supplies to create the page above:


X7259B Timber Paper Packet $9.50. Shown above.

X7259S Timber Paper Packet PLUS Sticker Sheet $13.50 Shown above.
Here's a close-up of the Sticker Sheet.

CTMH colours that coordinate with Timber are: Ruby, Sapphire, New England Ivy, Expresso, Toffee, Black and French Vanilla.

 X7259C Timber Coordinating Cardstock $13.50 Shown above.
12 sheets, 2 each of Black, Toffee, Ruby, Espresso, New England Ivy, and French Vanilla; 12" × 12".
1 sheet of coordinating die-cuts on heavy kraft paper with black matte foil designs; 6" × 12".

This Mix-in Paper Packet is designed to coordinate with both the Timber and the Summer Vibes collections in the July–August 2020 catalog. It will extend your other collections a little further with the ability to make more projects.

There is also Mix-in Coordinating Cardstock

CTMH also has a Timber Cricut Collection that has been designed to coordinate with the Timber collection. If you're interested in it, fill in your details under the contact box on the right side of my page, and I will send you the instructions on how to go about purchasing it.
See the images available, below:


Picture My Life Cards

24 double-sided pocket cards featuring unique designs, sentiments, and icons.
Timber Cardmaking Stamp Set

C1858 Timber - Cardmaking Stamp Set (9 stamps) $20.25
if you would like the coordinating Thin Cuts PLUS the stamp set, then the order number is: Z3750 $28.50
Artwork Tip: Create the exact plaid you want using the repeatable plaid image in the stamp set. Make your pattern as bold or as subtle as you like by choosing the ink and paper colours that work best!
Supplies used in the above cards:


A close up of the stamp set:

Timber Scrapbooking Stamp Set

D1941 Timber - Scrapbooking Stamp Set (15 stamps) if you would like the coordinating Thin Cuts PLUS the stamp set, then the order number is:
Artwork tip: Just like the Timber Cardmaking stamp set, this stamp set equips you to make your own plaid patterns, adding even more variety with layering stamp images! You can never have too much plaid!
Supplies used on the above layout:

A close-up of the stamp set:

Use the Timber Scrapbooking Workshop kit to create three coordinating 12x12" two-page layouts. The workshop kit includes exclusive die-cuts designed especially for these projects and assembly instructions that guide you in an optional embellishing technique using watercolour pencils.

G1208 Timber Scrapbooking Workshop Kit $47.25 (10% discounted price!) This price includes page protectors for your layouts. If you don't need page protectors, use this catalogue number G1208NP $40.50 (10% discounted price on this as well.)
Kit contents:
1 – Timber Paper Packet + Sticker Sheet (X7258S)
6 – cardstock sheets (2 New England Ivy, 1 Ruby, 1 Sapphire, 2 White Daisy)
3 – exclusive die-cut sheets; 12" × 12"
3 – exclusive patterned paper sheets; 12" × 12"
1 – Timber Die-cuts (X7259E)
4 – Top-load 12" × 12" Memory Protectors™
photo placeholders & printed instructions
Additional supplies needed:
Watercolor Pencils (Z3630, optional)
Black Journaling Pen (.01) (Z3515)
3-D Foam Tape (Z1151)
Layouts in the kit that you will complete:

Use the Timber Cardmaking Workshop kit to create 16 cards. 4 each of 4 designs. The workshop kit includes an exclusive B-size stamp set, that you won't find anywhere else in the catalogue, with coordinating Thin Cuts dies. There is also assembly instruction with tips for using sponge daubers on stamps.

Kit contents:
1 – exclusive stamp + Thin Cuts
2 – Timber patterned paper sheets
3 – cardstock sheets (1 sage, 1 Sapphire, 1 White Daisy)
1 – Wooden Arrows(Z3552)
16 – white card bases & envelopes
printed instructions
Additional supplies needed:
Ruby Exclusive Inks™ Stamp Pad (Z2870)
Sapphire Exclusive Inks™ Stamp Pad (Z2848)
New England Ivy Exclusive Inks™ Stamp Pad (Z2835)
Sponge Daubers (Z726)
Glue Dots® Mini Dots (Z341)
Thin 3-D Foam Tape (Z2060)
Here's a close-up of the stamp set in the kit:

Next are the 4 cards that you will make with the kit:


That's it for Timber!
There are so many ways to create with and enjoy this collection.Stay tuned through out the month of August as all CTMH consultants, including myself, will be sharing more projects made with Timber.
Happy Creating!
Linda


