Welcome Everyone!

Remember to "click" on all pictures if you'd like to see them a little closer.

Wednesday, April 24, 2019

Easter Day

Hi everyone!
Our family had a fabulous Easter Day, as I hope yours did as well, and we ended up taking a group picture which I wanted to document in my layout today.  

I decided to use Creative Scrapbooker Magazine's April sketch and the last of the paper from my Floral collection package.


I flipped the sketch around a bit and decided I liked this arrangement for my larger photo.  I have a Cricut file that I used to cut the circles and titles.  I made it shareable and the link is here if you would like to use it.

Here's a closer look at the title.  I used pieces of the Back to Basics collection to create the first couple of layers of it, and then Floral scraps for the rest.

For the embossing on both the title piece, and around the photos, I outlined everything with Glossy Accents, sprinkled it with Blue Island Slush embossing powder and heated it with my glue gun until it bubbled.  That gave it a cool, distressed look.

The pretty butterflies are from a file that Lisa Gregory made for us at the Swirlydoos kit club a few years ago.  I print them on matte photo paper, fussy cut them, and colour their edges black.  I thought this set coordinated nicely with the Floral collection.  Lisa still shares her beautiful butterflies on her blog "What a Beautiful Mess".  I've also created a link here for the file below that you can download to your computer.


This beautiful succulent was popped up on foam dots to add a little dimension.

*Tip:  Sometimes when you get done your page... it doesn't look quite right.  In the photo on the left, I didn't like how the circles blended together and didn't look like circles anymore.  I took a black marker and outlined the circle, making it darker on the inside and blending it out like a shadow.  This gave me back my distinct circles again.  While I had the pen out, I went around all the outer edges of the background papers and did a "faux" stitch on them.  

There's still a week left in the Wild Whisper April Challenge, share your Easter photos with us in a floral theme and earn a chance to win a double pack of the Floral collection!  

Thanks for checking out the blog today!

Wednesday, April 17, 2019

Wild Whisper Floral Mini Album

Hi everyone!  
Today is a beautiful Spring day and the perfect time to share this project with you!


I saw this tutorial for a mini-album on Splitcoaststampers, this week and knew I had to make it with the Floral collection and all the beautiful coordinating ephemera pieces.  (To see the tutorial and paper collection, just click on each highlighted link.)

To start with, I cut two 14" pieces of white satin ribbon and colored it with Copic marker BG57.  I left it streaky because I wanted it to have a shabby/chic look.

This is the outside of the mini-album.

To add some interest and dimension to each side of the birdhouse, I glued down a sparkly piece of acetate and topped it with a lattice die cut that I cut from one of the blue pieces of cardstock in the Back to Basics paper collection.


I am using some handmade bird embellishments that I had in my stash, along with wood veneer pieces, and pieces from the gorgeous Floral ephemera pack. 
To tie my handmade embellishment to the Floral pieces, I added the little black and white stems from the Floral ephemera and tucked it in.  I also tucked more of the Floral pieces underneath it.


I used pop up foam dots on every page of this mini album. They give great dimension to the pages and also give you height to tuck things under as I did with the Wild Whisper flair button.

Here's a photo that shows all the dimensional layers on the page.
  
Look at the beautiful detail on the succulent from the ephemera pack.  It looks so real you almost feel you need to water it!


The last page on the outside of the album.


Photos on inside.


To keep it looking uniform, I matted each photo with a piece of the green flowered paper in the Floral paper collection, a lacy white die cut from Gina Marie Designs, and of course more of the embellishments from the ephemera pack.


For the roof of the house, I cut scallops from the beautiful leafy piece of cardstock in the collection, inked them with black ink and staggered them to look like shingles.


This mini album was so fun to make... I encourage you to give it a try.  (Just go to the Splitcoaststampers tutorial for all measurements and even a video that shows you how to put it together.)  It's a lovely gift and the package of ephemera goes a LONG way when you are decorating it.
Happy Easter!
Linda


Wednesday, April 10, 2019

Wild Whisper Floral Cardmaking

Hi everyone,
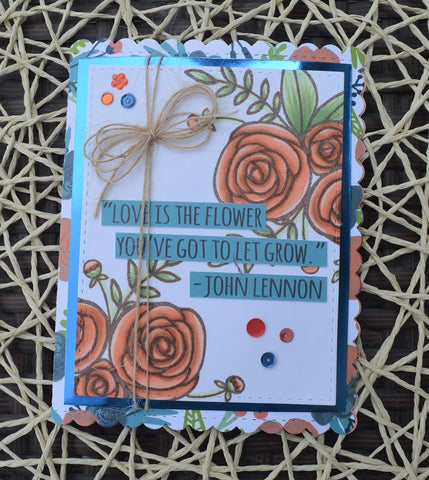
Today I'm going to show you how I played with the largest stamp from the Floral stamp set and created 3 cards with all the same materials, but still ended up with a different look on each card.
I was able to create a different look, by placing the stamp differently on each card.
I used the above piece of patterned paper from the Floral collection for the card base, and coloured the roses with Copic markers.  Copics used were:  Flowers:  E00, E01, E02, E95, E99   Leaves:  G20, G82  
To colour the roses I used a very simple colouring style.  On each petal I started with my darkest colours on the inside edge and blended out to the lightest.
Each card was backed with Tonic Studios Mirror Glossy cardstock in Imperial Blue because I liked the way it brought out the blue in the Floral patterned paper.  The bows for each were made as showed above.  The twine was a very fine twine.  I wrapped it around three fingers to create the loops and then tied them in the middle and glued them down on top of the card and fluffed out the bow.
For card number 1 above, I cut the word strip from one of the patterned papers in the Floral collection and then cut it up to fit my card.  The sequins used on all of the cards are from the Crazy Motivated pack which is sold out in the Wild Whisper online store, but you can still find them here, in the ScrapShotz store.
I created the inside of all three cards in the same manner, decorating a plain piece of white paper with one of the pretty florals in the ephemera package.
Card number 2 is all about that pretty, pretty, Floral stamp.  Stamping it right in the center makes it the focus of the card.
Card number 3 uses another word strip from the Floral patterned papers.  I love all the quotes Suzy and Heather chose, and this one is definitely ME!  With this set of quotes, I inked the edges of each piece with Tim Holtz Walnut Distress Ink.
By creating a series of cards using the same materials, you are able to craft more efficiently because you're not searching for a bunch of different items.  They're all there on the table in front of you!
Thanks for stopping by today!  I hope I have inspired you to get busy and enjoy some cardmaking fun!!
Linda

Wednesday, April 3, 2019

Wild Whisper's new collection "Floral"

Hi everyone!  Welcome to a new month and a new Wild Whisper collection called Floral!  
Succulents, leaves, tropicals, vibrant colours, and the most beautiful roses... Floral has it all!
I've got so many ideas buzzing through my head on how to use this collection this month, that I decided to start by harnessing them in a travel journal notebook.

In the photo above I'm planning out my journal.  Wild Whisper is collaborating with Xyron Adhesives this month, and I had a choice of two sizes to work with:  a 1.5" Disposable Sticker Maker and a 3" Disposable Sticker Maker (both are recyclable).  The smaller one fit the word strip from this piece of paper. (I cut it up into 3 pieces to fit the narrow width of a travel journal.)  The little sticker makers worked fabulously, coating the strips quickly and easily with a really sticky tape, by pushing them through the maker and pulling them out the other side.
I cut several sheets of paper 8.5 in x 8.25 in, and used the smaller flowers from the Floral stamp set to stamp around the edges of one of them.  (Just to pretty it up and play with the stamps.)  :)  Copics used were:  Flowers:  E00, E02, E95, Leaves:  G20, G82
Here is the completed journal.  How pretty are those ephemera pieces!!!  They slipped through the Xyron Sticker Makers quickly and easily as well.
One of the things I want to practise this month is hand lettering, so I attached the sample lettering in my journal to have a quick reference when I need it.
Here's a close up.  (In case you want to give it a try too!)
The other thing I'm going to tuck in my journal is this practise piece of paper that I stamped out with the Floral stamp set.  I'm going to experiment with some watercolouring on it as I'm thinking about doing a watercoloured layout for one of my projects.
I think that taking time to practise on a scrap of paper helps you get a feel for the stamps you're using and how best they look together before you put them on a project.
Now, I'm ready to get working on the rest of my projects this month!  It's nice to feel organized!!
Thanks for stopping by!  Happy creating!